
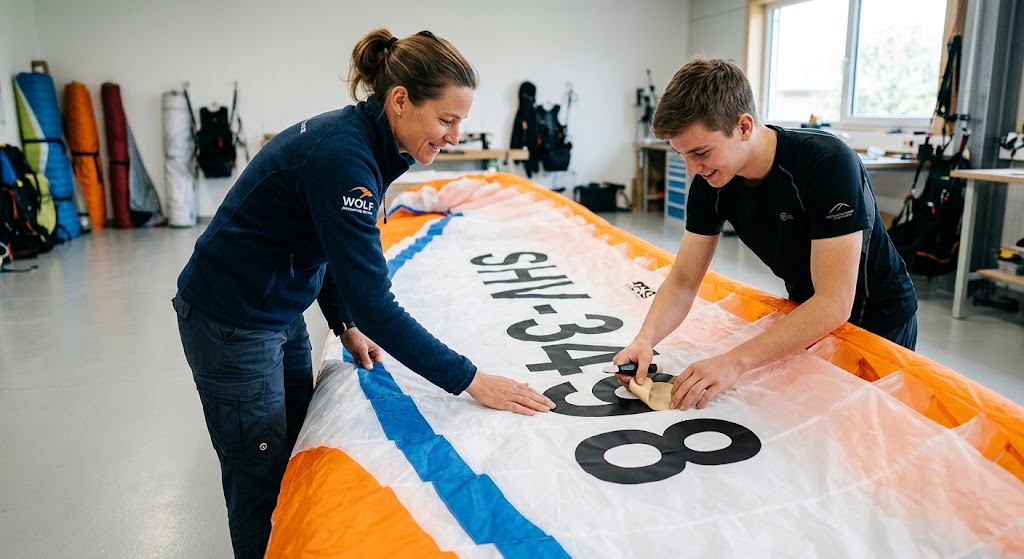
In summary, this guide covers Swiss Federal Office of Civil Aviation (FOCA) compliance standards, step-by-step canopy preparation, weight distribution considerations, and proper removal techniques to help pilots keep their wings airworthy and legally compliant.
Whether launching into thermal updrafts over the Alps or executing precise spot landings, maintaining clear glider identification and canopy integrity remains essential. Applying dynamic decals, custom sponsor branding, or official registration codes directly to a paraglider wing requires specialized materials and careful application techniques. Using rigid vinyls or heavy industrial stickers can severely compromise wing flexibility, alter airflow aerodynamics, and damage sensitive polyurethane canopy coatings.
By understanding proper adhesive selection, surface prep, and regulatory standards, pilots can customize their gliders while maintaining structural safety, maximum performance, and resale value.
5 Critical Rules for Paraglider Wing Markings
- Adhere to Legal Dimensions: Swiss civil aviation rules require official wing numbers to feature a minimum character height of 40 centimeters on the undersurface to ensure ground-to-air visibility.
- Prioritize Fabric Weight: Only use ultra-lightweight Ripstop nylon adhesives weighing between 27 g/m² and 38 g/m² to prevent asymmetry and canopy drag.
- Ensure High Visual Contrast: Select digit colors that contrast sharply against the lower sail background—such as deep black digits on white or yellow panels.
- Preserve Porosity Coatings: Avoid aggressive solvent cleaners like acetone or brake cleaner, as they dissolve internal silicone and polyurethane seals.
- Apply at Optimal Temperatures: Perform all adhesive installations in room-temperature environments between 18°C and 22°C to ensure strong acrylic bonding without heat-shrinking the fabric.
Swiss SHV Registration Standards and Legal Compliance
In Swiss airspace, operating a paraglider requires strict adherence to official identification protocols established by the Federal Office of Civil Aviation (BAZL / FOCA) and managed by the Swiss Hang Gliding and Paragliding Association. Under civil aviation laws, every free-flying glider must display its assigned registration sequence prominently on the canopy.
Obtaining an official SHV Nummer ensures clear ground identification during cross-country flights, airspace monitoring, and emergency search-and-rescue operations
Failing to meet these dimensional and legibility guidelines can result in administrative fines or disqualification from official flight events and regulated airspace zones.
Material Comparison: Ripstop Nylon vs. Traditional Vinyl Decals
Choosing the right material for wing customization is critical. Standard sign-making vinyls cause localized stiffening, uneven canopy inflation, and fabric degradation. Specialized paragliding adhesive textiles maintain wing flexibility and structural integrity.
| Feature / Metric | Ultra-Light Ripstop Nylon (27–38 g/m²) | Standard Commercial Vinyl (80–100 g/m²) |
| Flexibility & Wing Deformation | Flexes naturally with canopy inflation | Creates rigid tension spots & wing distortion |
| Weight Impact (5-Digit Code) | ~18 to 28 grams total | ~90 to 140 grams total |
| Adhesive Chemical Base | Modified water-resistant acrylic | Solvent-based heavy rubber/acrylic |
| Porosity Impact | Safe for silicone & PU coatings | Risk of coating dissolution |
| Clean Removal | Heat-free peeling, leaves minimal residue | Leaves sticky residue requiring harsh solvents |
Professional customization providers like Wolf paragliding service rely on specially formulated Ripstop nylon material to match the exact physical properties of modern gliders.
Step-by-Step Instructions: Applying Canopy Markings Correctly
Executing a clean installation prevents air bubbles, wrinkles, and misalignment. Follow these sequential steps to apply wing lettering or registration digits safely:
Step 1: Prepare the Surface
Lay the paraglider flat on a clean, smooth indoor floor away from dust, drafts, and direct sunlight. Carefully isolate the lower sail panel receiving the decal. Clean the target surface using a soft microfiber cloth lightly moistened with isopropyl alcohol (max 70% concentration). Allow the cloth to evaporate completely.
Step 2: Lay Out and Measure
Position the transfer sheet holding your custom lettering or registration digits across the glider cells. Measure distances from the leading edge and cell seams to ensure the text runs perfectly parallel to the wing structure. Secure the outer edges in place using low-tack painter’s masking tape.
Step 3: Apply the Decal
Peel back one edge of the backing paper at a sharp 45-degree angle. Press the exposed Ripstop material firmly onto the fabric starting from the center and working outward. Smooth down the adhesive smoothly with a squeegee or soft felt card to prevent trapped air pockets.
Step 4: Remove the Transfer Foil
Carefully pull away the top transfer film by folding it flat against itself at a 180-degree angle. Work slowly across each digit to ensure thin material edges remain firmly bonded to the wing fabric.
Step 5: Cure the Adhesive
Firmly press down all outer edges with a dry cloth. Allow the acrylic adhesive to cure undisturbed at room temperature for 24 hours before packing the glider into its concertina bag.
Technical Specifications: Material and Weight Performance
Using high-performance fabrics prevents flight characteristics from degrading over time. Specialized gliders use precise material combinations to balance durability and weight:
- Fabric Base Weight: 27 g/m² to 38 g/m² ultra-light nylon matrix.
- Adhesive Layer Weight: 50 g/m² solvent-free acrylic compound.
- Air Permeability Score: Zero porosity shift across covered fabric zones.
- Temperature Resistance: Stable from -20°C to +60°C.
When ordering custom Gleitschirm Beschriftung, verifying fabric density and adhesive specifications helps preserve original wing dynamics and stall margins.
Pros and Cons of Wing Customization
Advantages
- Instant Visual Identification: Clear numbers streamline flight log verification and spot-landing monitoring.
- Deterrent Against Theft: Distinctive registration sequences and custom logos make stolen gliders easy to identify and difficult to resell.
- Sponsorship and Visibility: Large canopy lettering gives commercial pilots and competition athletes high-contrast promotional real estate visible from the ground.
Disadvantages
- Installation Errors: Improper application can trap air bubbles or create fabric tension along cell seams.
- Resale Considerations: Buyers may require previous registration numbers to be completely removed before completing a purchase.
Practical Examples and Common Application Pitfalls
Example A: Successful High-Contrast Application
A pilot applies a 5-digit registration code using 27 g/m² black Ripstop digits onto a bright lime-green lower sail panel. Because the surface was thoroughly cleaned and the adhesive was applied indoors at 20°C, the decal lays completely flat without pulling on the seams. The wing inflates smoothly without drag or asymmetric tension.
Example B: Avoidable Installation Failure
A pilot attempts to install rigid vinyl lettering outdoors on a breezy, 8°C day without cleaning the wing first. The cold temperature prevents the adhesive from bonding fully, while airborne dust gets trapped underneath the transfer sheet. Within three flights, the leading edges of the numbers peel back, catching the wind during launch inflation.
Maintaining Canopy Integrity and Clean Removal
Eventually, wings may need re-registration or graphic updates before a resale. Removing Ripstop lettering cleanly requires patience and gentle handling:
- Warm the Surface Gently: Use a household hair dryer set to low heat to soften the acrylic adhesive without overheating the nylon fibers.
- Peel at an Acute Angle: Pull the Ripstop material back slowly parallel to the wing fabric rather than yanking it upward.
- Clean Remaining Adhesive: Dab leftover glue with a soft lint-free cloth lightly dampened with isopropyl alcohol. Avoid scrubbing or applying heavy pressure to protect the underlying coating.
According to aviation safety research documented by the Federal Aviation Administration (FAA) , preserving structural fabric integrity and wing coatings is essential for maintaining load limits and aerodynamic safety margins. Additionally, wing inspection guidelines outlined by the Civic Aviation Authority (CAA) emphasize checking surface porosity regularly, especially near adhesive borders.
Following these core guidelines ensures your wing remains compliant, aerodynamic, and visually striking throughout its operational lifespan.


You’re truly a just right webmaster. The site loading
speed is amazing. It kind of feels that you’re doing any
distinctive trick. In addition, The contents are masterwork.
you have performed a magnificent task on this topic!
It’s an awesome paragraph designed for all the internet visitors; they
will obtain benefit from it I am sure.
Remarkable things here. I am very glad to look your post. Thanks so much and I am having
a look forward to contact you. Will you kindly drop me a mail?
Howdy! I just wish to offer you a huge thumbs up for your great info you’ve got here on this
post. I’ll be coming back to your website
for more soon.